
Network Card Installation and Configuration
Note
If upgrading the software or installing on a computer that will not be connected to the 7500 controller (hardware), skip this step.
If the computer that will have the CSS Software installed does not have a secondary Ethernet card, it is necessary to install a network card that will be dedicated for communication to the 7500 controller. A second Ethernet card is added for the following reasons:
- prevent IP address conflict
- dedicated for communication only for 7500 controllers
- prevents the need to change IP addresses on the controllers
- isolated from other network traffic
- removes the need for any security software as network is isolated
All systems assembled at Vena come with a computer with a secondary ethernet card installed. It is not necessary to perform this installation process for a computer that was delivered with the system. The only reasons that this installation step might be required are as follows:
- replacement of the computer
- network card failed
- network card driver or settings were lost
To install a secondary Ethernet card proceed with the following steps:
Install the ethernet card provided from Vena following the installation steps that came with the device.
Turn on the computer and verify that the Ethernet card is recognized by Windows and is displayed in the Network Connections dialog.
Note
To display the Network Connections dialog, select .

Right-click on the network connection and select Rename. Change the name to VENA NET.
Right-click on the network connection (now labeled VENA NET) and select Properties.
Make sure ONLY Internet Protocol Version 4 (TCP/IPv4) is selected. No other check box should be selected.
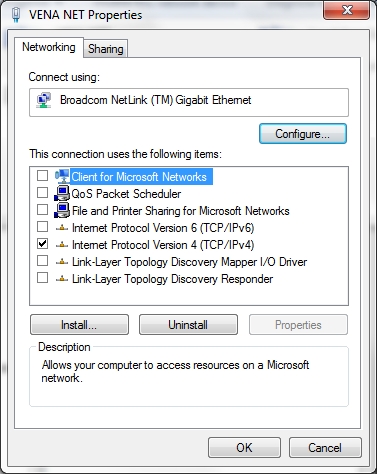
Select Internet Protocol Version 4 (TCP/IPv4) and press Properties.
Select Use the following IP address:.
Set the IP address: to: 172.20.20.254
Set the Subnet mask: to: 255.255.255.0
Select Use the following DNS server addresses:.
ALL other fields should be left BLANK.

Press OK